
Table of Contents
ToggleWhat are bioswales ? Why homeowners need them?
Residential properties are a major contributor to stormwater problems across the United States and worldwide. Research shows that homes hold 20-30% of urban runoff pollution. This polluted runoff carries fertilizers, oils and sediments into storm drains that directly affect rivers and local ecosystems. However, there’s a smart solution – residential bioswale design which transforms erosion prone lawns into functional green infrastructure.
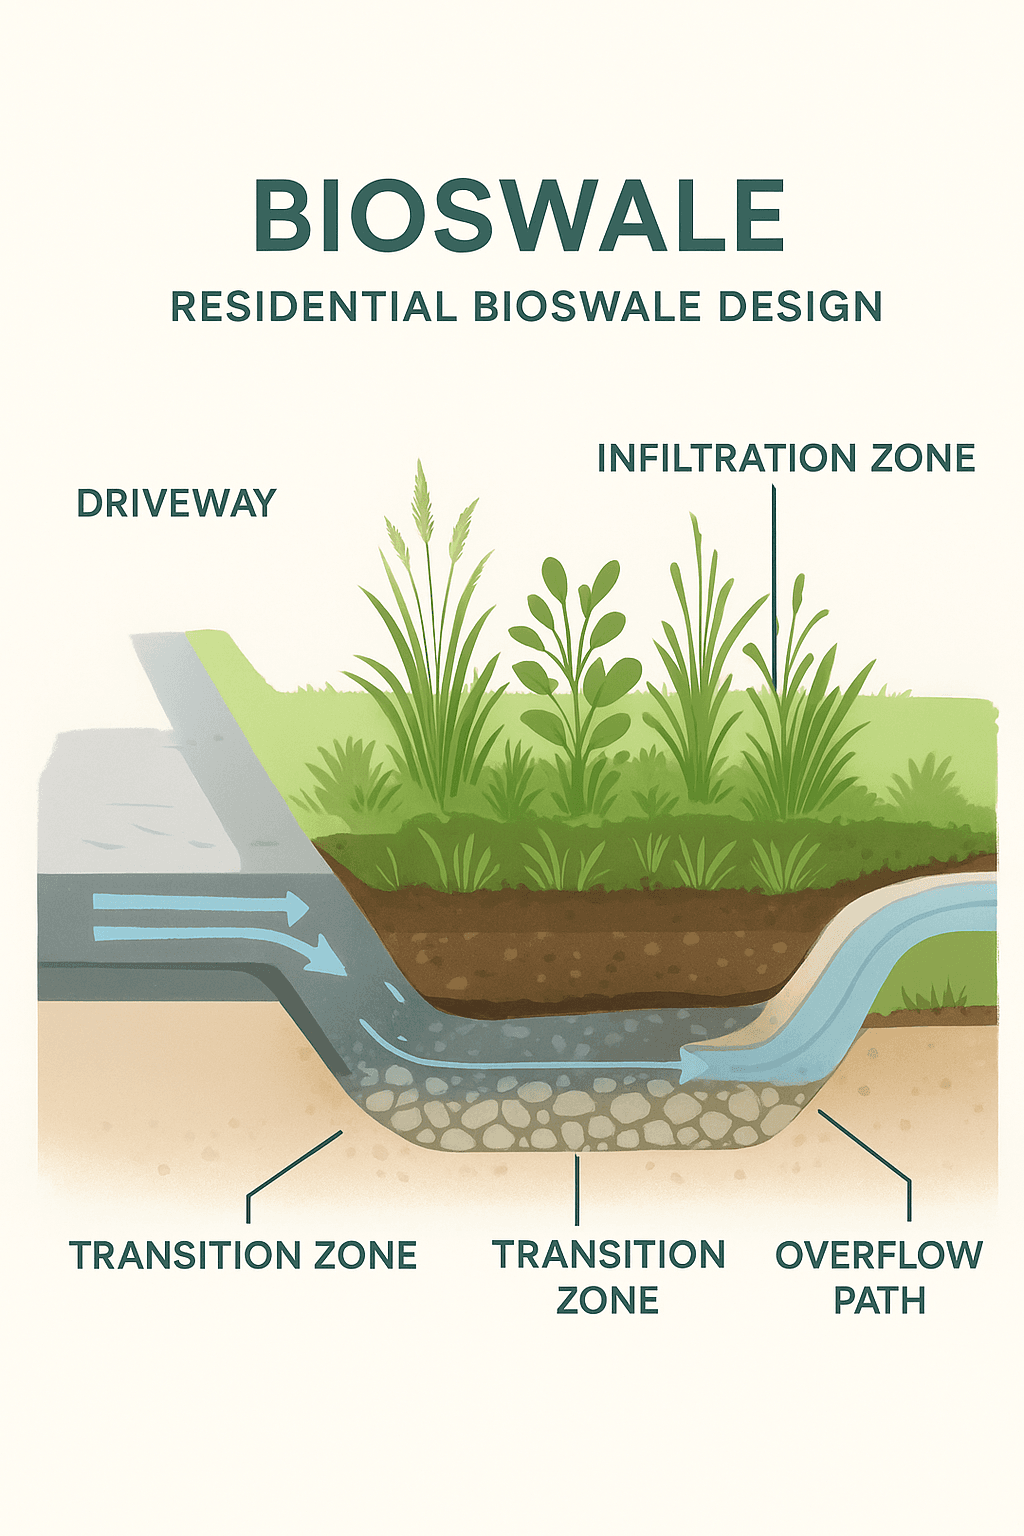
Properly built bioswales can filter out 65-71% of solids and reduce localized flooding by nearly 50%. This makes them one of the most cost-effective homeowner strategies in 2025. So, what is a bioswale? It’s a linear & vegetated channel that is typically 6-18 inches deep and 2-10 feet wide. It is engineered to slow down, capture and infiltrate stormwater.
Traditional ditches simply divert water but a bioswale cleans it through a layered system: Vegetation and amended soils absorb pollutants whereas gravels provide drainage. There are several options for homeowners. Dry bioswales use gravel and drought-tolerant grasses for low-rainfall regions while wet bioswales remain moist year-round and support water-tolerant plants.
For comparison, rain gardens function similarly but they are deeper basins rather than long channels. A well-planned bioswale can save $500–$2,000 annually in drainage costs and increase property value by 5-10% with eco friendly landscaping. Moreover, a functional system can be installed over a single weekend for just $300–$800.
Planning Your bioswale: Site Assesment
The success of any residential bioswale design starts with proper planning. Before digging, homeowners should carefully assess site conditions to ensure water can infiltrate efficiently without threatening nearby structures.
Step 1: Site Evaluation
You have to look for a gentle slope- 1-6% is ideal. Remember, anything that’s steeper will cause erosion and flat sites may not drain properly. You can use any simple smartphone-level app to confirm this. Next, test your soil’s infiltration rate with a quick “jar test.” If your soil absorbs at least 0.5 inches of water per hour then it’s suitable for a bioswale.
Step 2: Runoff Calculation
To size the bioswale correctly, you can use a simple formula:-
Runoff (gallons) = Roof/Driveway Area (sq ft) × Rainfall (inches) × 0.623.
The bioswale should be 5-10% of the area draining into it. For example, a 1,000 sq ft driveway with 2 inches of rainfall generates about 1,246 gallons of runoff will require a swale about 50–100 sq ft. Clay-heavy soils may need deeper gravel layers for better drainage while sandy soils may require organic matter to slow infiltration. Always keep bioswales 10 feet away from foundations to avoid basement moisture. Also check the local rules.
Materials List and Realistic Cost Breakdown
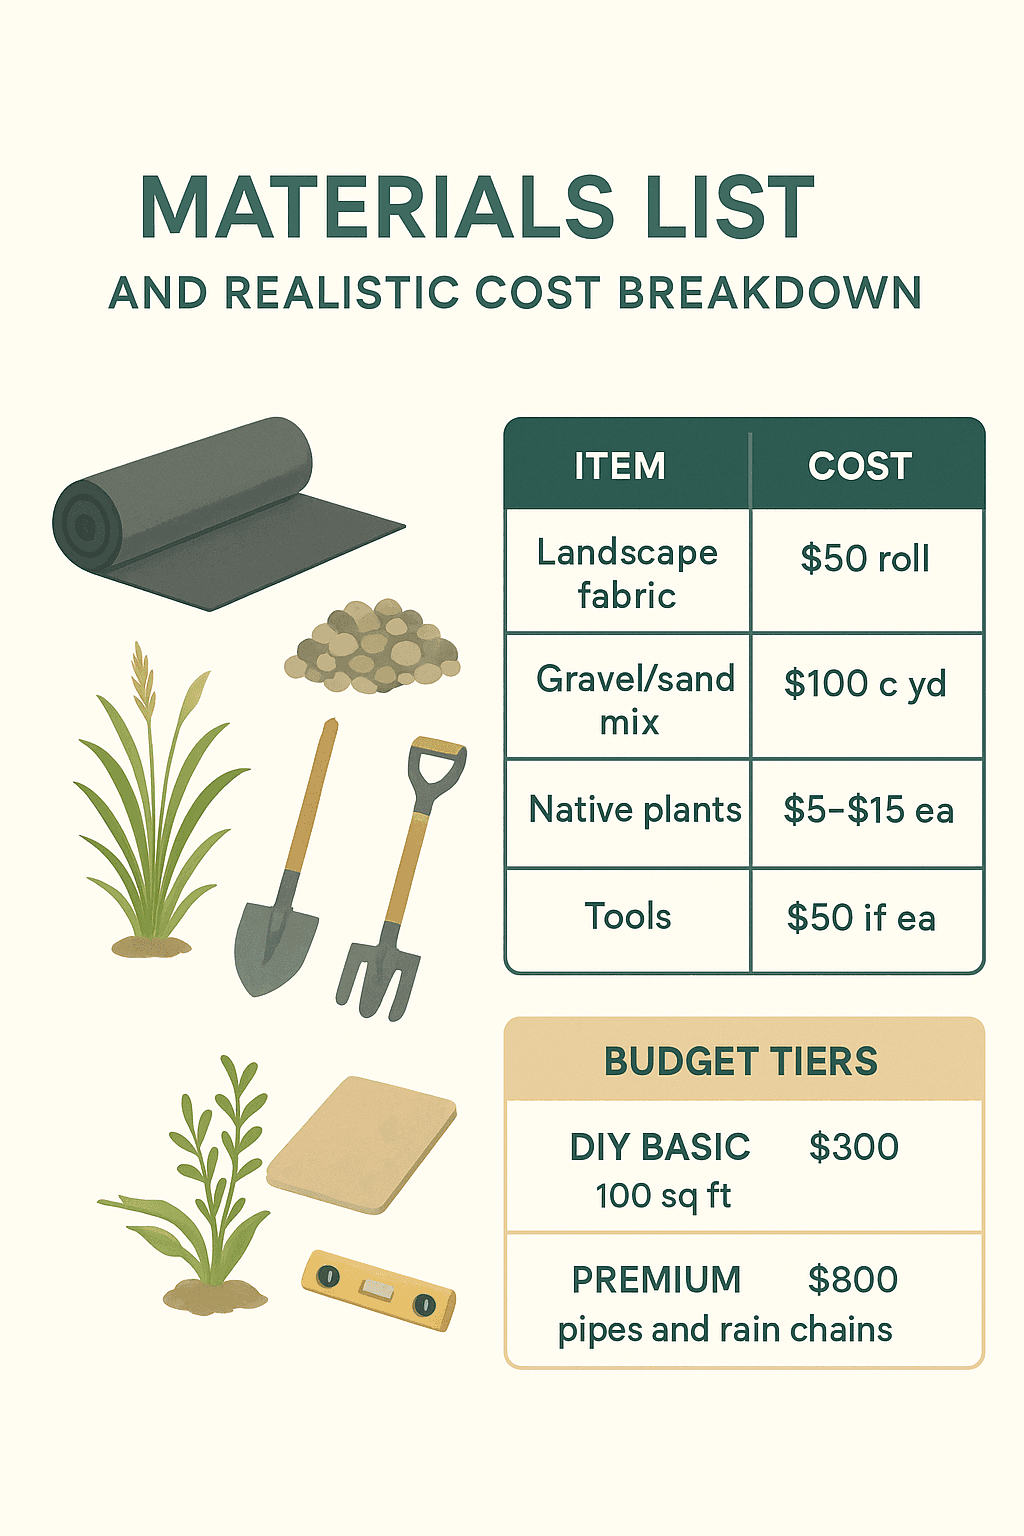
A successful residential bioswale design doesn’t require fancy equipment but choosing the right materials can ensure long-term performance and low maintenance. Every system needs four essential materials:-
- Landscape fabric (~$50/roll) to separate soil from gravel and prevent weeds.
- Gravel/sand mix (¾” base, about $100 per cubic yard) to promote drainage and support plant roots.
- Native plants (10–20 varieties at $5–15 each) with deep roots that filter pollutants while stabilizing soil.
- Basic tools (shovel, level, wheelbarrow—around $40 if purchased).
These prices could also vary, it is just an average. A small 100 sq ft swale can cost around $300 at the start (when reusing yard soil and free mulch). A premium upgrade may cost around $800 which may include rain chains, perforated pipes or decorative edging for better water control and aesthetics.
Cost-Saving Tips
Bulk orders from local nurseries often reduce plant costs by 20-30%. Reusing excavated yard soil or sourcing free municipal mulch can cut expenses significantly. You can also swap in recycled permeable pavers (around +$200) to enhance infiltration by up to 20%. You can also compare alternatives through an itemized cost table to make it clear where to splurge and where to save.
Step-by-Step Installation of residential bioswale
A good residential Bioswale design succeeds in the field because of careful preparation and simple + repeatable steps. Here’s a detailed and practical installation workflow.
Marking & Preparation
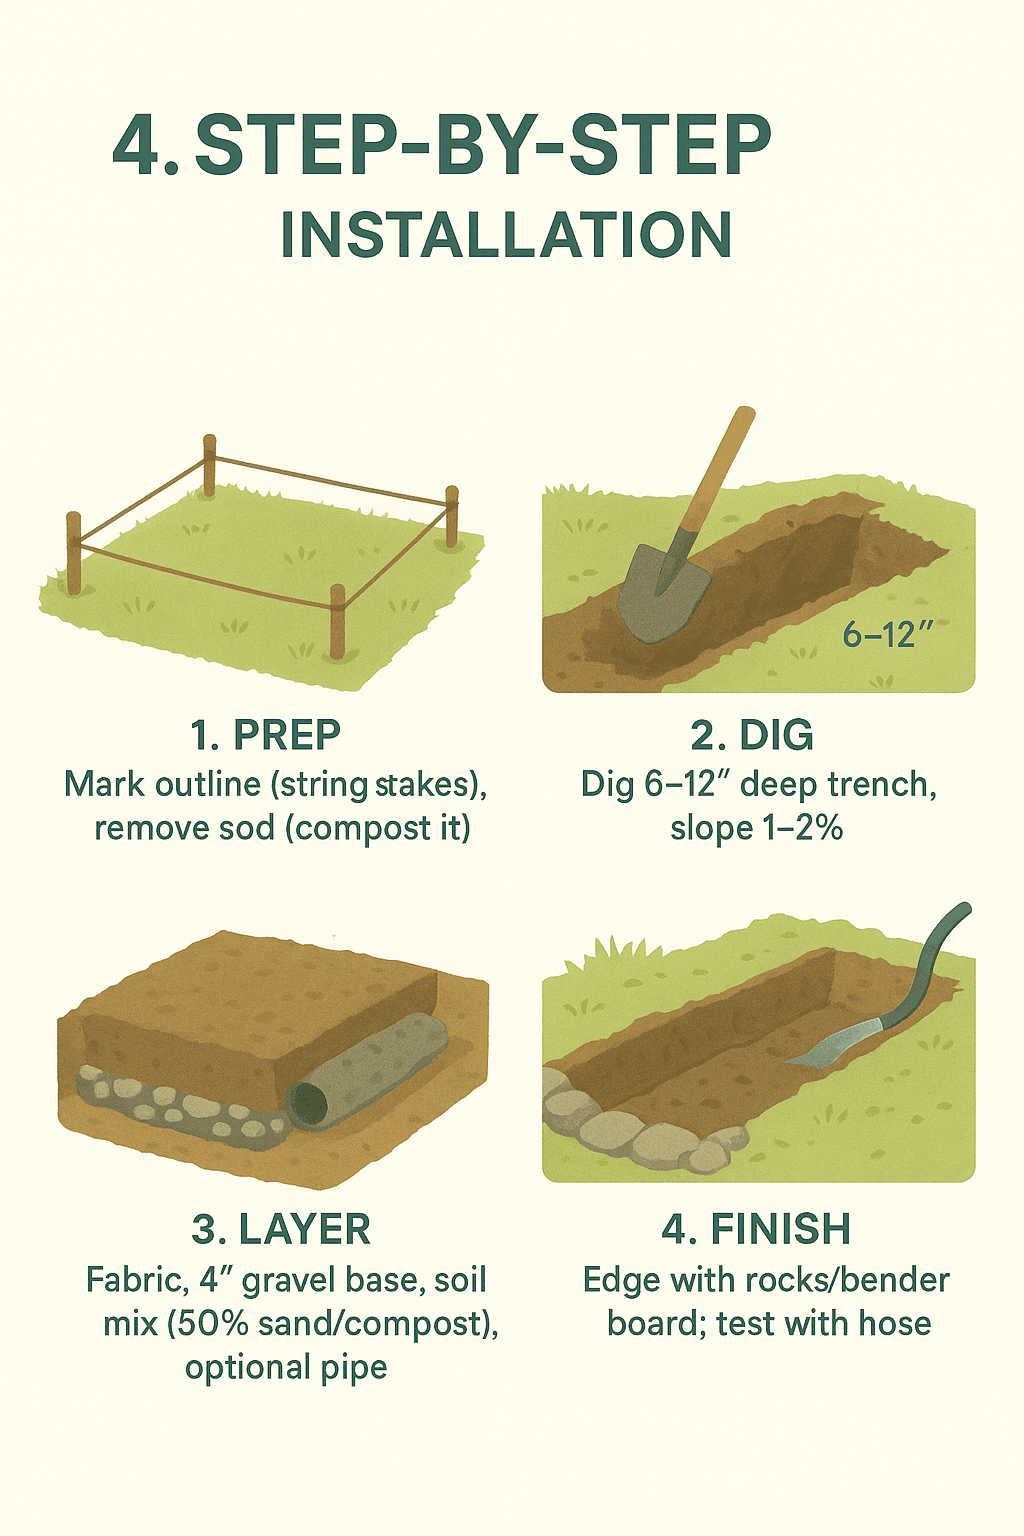
First, you have to mark the outline of your bioswale by using a string and stakes. Keep in mind the slope- a gentle 1-2% grade works best, which means the swale should drop about 1-2 feet for every 100 feet in length. This ensures slow water movement. Remember to check underground utilities before you dig. Once that’s clear, remove the grass or sod from the area and compost it or use it elsewhere in your garden.
Digging the Trench
Now comes the real work- digging. Your trench should be 6-12 inches deep. It usually depends on your soil and runoff volume. Shape the sides at a slight angle instead of cutting straight down so that they don’t collapse. If your yard is steep then you can add small rock “check dams” across the trench to slow water flow.
Building the Layers
Spread about 4 inches of gravel at the bottom. This will help water to drain away steadily. Next, add 2-4 inches of amended soil which should be made of 50% sand and 50% compost or topsoil. This mix filters pollutants and gives plants a healthier base. Some homeowners also add a piece of landscape fabric between gravel and soil to keep the layers separate, especially in heavy clay soils.
Edging and Planting
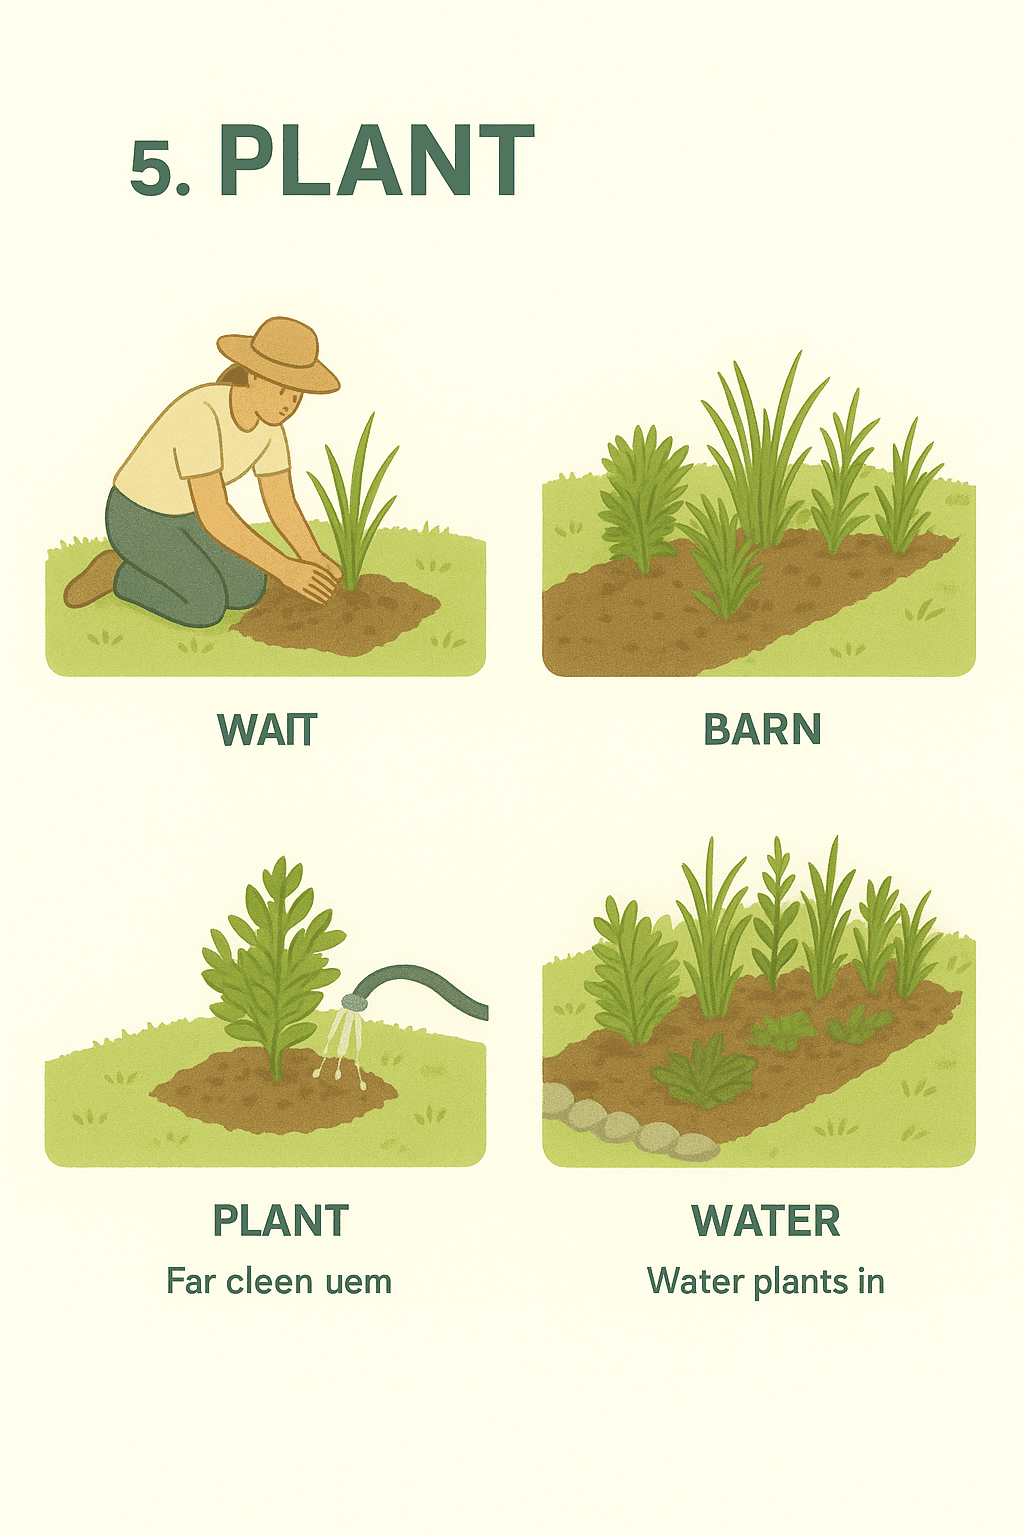
Add edging with rocks, bender boards or even logs to keep everything tidy. This prevents erosion at the sides. Now, plant your chosen native species – grasses, shrubs or flowering perennials that can handle both wet and dry conditions. Space then 12-18 inches apart. After planting add 2 inches of mulch to hold in moisture and block weeds, but keep mulch away from plant crowns.
Overflow and First Water Test
Always plan for heavy rain. Create a small overflow path or install an optional perforated pipe at the base so water has somewhere to go during big storms. At last you have to test your garden. Run a garden hose or wait for rainfall. A properly built swale should absorb water within 24–48 hours. If pooling continues after the given time then adjust the slope slightly and add more gravel or check for clogs at the inlet.
Tools & Materials Checklist
Shovel, trenching spade, wheelbarrow, string & stakes, transit/laser level (smartphone level for rough work), tape measure, tamper (optional), landscape fabric, ¾” gravel, coarse sand, compost, native plants, perforated pipe (optional), bender board/rocks, gloves, knee pads.
With the help of 2 people a 100sq ft bioswale can be completed in just 2 days. Keep it simple and your backyard will soon have a stormwater solution that looks beautiful and works hard.
What are the Right plants for bioswales?
Plants are the real workhorses offer residential bioswale design. They not only make the swale look attractive but they also clean, filter and slow down the water. Our main aim is to choose species that can handle both extremes: stormwater events and dry periods in summer.
Start with native grasses like switchgrass, sedges, or rushes. These have deep root systems that stabilize the soil and create natural pathways for water to soak in. Add shrubs such as red osier dogwood or elderberry which provide structure, prevent erosion and attract pollinators. According to the U.S. EPA’s “Grassed Swales: grassed swales can achieve removal of 16–81% of Total Suspended Solids depending on design variation.
You can include perennial plants for color and biodiversity, such as – black-eyed Susan, coneflower or bee balm. These flowering plants will brighten the space and support bees and butterflies. Spacing in bioswales always matters. Keep plants 12-18 inches apart so they have room to spread and form dense coverage. Use 2-3 inches of mulch after planting to lock in moisture and suppress weeds but leave a small gap around each plant’s base to avoid rot.
In my opinion, a mix of 70% grasses and 30% shrubs or flowers usually works best. This combination will balance strength, beauty and water absorption that turns your bioswale into both a functional stormwater solution and a mini wildlife habitat.
Key benefits of bioswale
A perfect residential bioswale design does many more things than just handling stormwater. It brings multiple long-term rewards for homeowners and the environment.
Environmental Benefits:
Bioswales capture and filter up to 80% of pollutants like oil, fertilizers and heavy metals before they reach rivers. They also absorb nearly 90% of stormwater volume and reduce local flooding and soil erosion. And not only this, they can also create small habitats (with native plants) that support birds, bees and butterflies in your backyard.
Financial Benefits:
Since these bioswales reduce yard flooding and erosion damage, they can save families $500–$2,000 per year in drainage and repair costs. Some cities also offer rebates or grants (up to $5,000 in certain regions) for homeowners who install green infrastructure, which makes the investment even more rewarding.
Aesthetic Benefits:
Unlike concrete drains a bioswale is living, colorful and blends beautifully into the landscape. It can raise property value by 5-10% while giving your yard a unique and eco-friendly charm. Think of it as a natural feature that works like hidden infrastructure but looks like a garden.
In short, a bioswale is not just a drainage solution it’s a smart upgrade that delivers beauty, savings and sustainability all at once.
FAQs
What is the main purpose of a residential bioswale design?
A residential bioswale design is created to manage stormwater runoff in home landscapes. It slows down and absorbs rainwater to prevent flooding, soil erosion and water pollution. It also adds beauty and supports local wildlife.
How much does a residential bioswale design typically cost homeowners
The cost of a residential bioswale design usually ranges between $300 and $800. However, these prices may vary according to materials, size and plant selection. Yet in the long term it saves money by reducing yard repairing costs, flood damage and drainage costs.
Can residential bioswale design increase property value?
Yes. A well-planned residential bioswale design not only improves drainage but also adds curb appeal with attractive plants and landscaping. Eco-friendly features like bioswale can boost property value by 5-10% which makes it a practical and financial upgrade.